728x90
반응형


* 본 포스팅은 주피터 노트북에서 진행하였다.


!pip install matplotlib
import matplotlib.pyplot as plt
data = [1,2,3,4,3,2,1]
plt.figure('그래프 이름')
plt.plot(data)
plt.show()
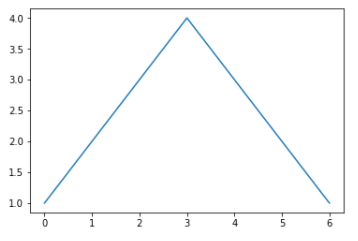
 

import matplotlib.pyplot as plt
x = [10, 20, 30, 40, 50, 60, 70]
y = [1,2,3,4,5,2,1]
plt.figure('그래프 이름')
plt.plot(x,y)
plt.show()


import matplotlib.pyplot as plt
import numpy as np
time = np.arange(0,10,0.01)
y = np.sin(time)
plt.figure('그래프 이름')
plt.plot(time,y)
plt.show()


이 코드의 arange는 0부터 10까지 0.01간격으로 등분


import matplotlib.pyplot as plt
import numpy as np
time = np.arange(0,10,0.01)
sin_y = np.sin(time)
cos_y = np.cos(time)
plt.figure('그래프 이름')
plt.plot(time,sin_y)
plt.plot(time,cos_y)
plt.show()


import matplotlib.pyplot as plt
import numpy as np
time = np.arange(0,10,0.01)
sin_y = np.sin(time)
cos_y = np.cos(time)
plt.figure('sin, cos 그래프')
plt.plot(time,sin_y, label='sin')
plt.plot(time,cos_y,label='cos')
plt.legend() #범례
plt.xlabel('time')
plt.ylabel('value')
plt.title('sin, cos Grapeh') #그래프 이름
plt.grid() #그리드 설정
plt.show()


import matplotlib.pyplot as plt #막대 그래프
import numpy as np
data=[10,20,30,55]
x=[0,1,2,3]
plt.bar(x,data,width=0.3)
plt.show()
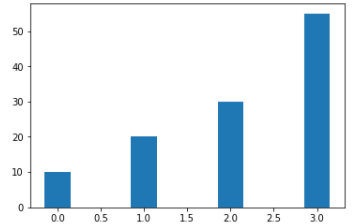
 

가로형 막대 랜덤 으로 생기기


1.

import matplotlib.pyplot as plt #막대 그래프
import numpy as np
y_data = []
x_data = []
for i in range(6):
    x_data.append(i)
    y_data.append(np.random.rand()*20)
plt.bar(x_data, y_data,width=0.5)
plt.show()


2.

import matplotlib.pyplot as plt #막대 그래프
import numpy as np
a = np.random.random(4)
data = np.random.random(4)
plt.bar(a,data,width=0.1)
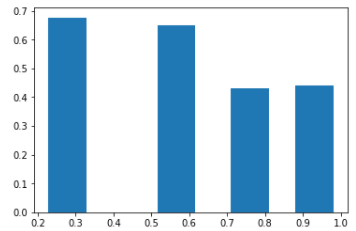
 

가로형 막대 그리기

import matplotlib.pyplot as plt #막대 그래프
import numpy as np
data=[10,20,30,5]
x=[1,2,3,4]
plt.barh(x,data,height=0.3)
plt.show()


원형 그래프 그리기

import matplotlib.pyplot as plt #막대 그래프
import numpy as np
data=[10,20,30,5]
plt.pie(data)
plt.show()

728x90
반응형
728x90
반응형

https://devbruce.github.io/python/py-17-decorator/


[Python] Decorator (1)


devbruce.github.io


위 사이트에 Decorator의 설명가 예제가 잘 되어있어


사이트에 있는 예제를 기반으로 공부하고 내가 추가로 함수를 만들어 보며 Decorator에 대해 알아보았다!


Decorator란

  • 어떤 함수를 받아 명령을 추가한 뒤 이를 다시 함수의 형태로 반환하는 함수.
  • 어떤 함수의 내부를 수정하지 않고 기능에 변화를 주고 싶을 때 사용한다.
  • 함수를 꾸며준다.

자바의 Closure와 비슷하다.


Decorator의 구조

def 데코레이터이름(func):  # 기능을 추가할 함수를 인자로 받아온다.
    def 내부함수이름(*args, **kwargs):
        기존 함수에 추가할 명령
        return func(*args, **kwargs)
    return 내부함수이름


사이트에 있는 예제로 Decorator에 대해 이해해 보았다.


def test(a,b):
    print("계산 시작합니다.")
    print(a+b)
    print("계산 완료되었습니다.")
def test2(a,b):
    print("계산 시작합니다.")
    print(a*b)
    print("계산 완료되었습니다.")
def test3(a,b):
    print("계산 시작합니다.")
    print(a//b)
    print("계산 완료되었습니다.")


 print문이 매우 노가다이므로 이걸 Decorator를 사용한다!


def deco_func(origin_func):
    def nested_func(*args, **kwargs):
        print("계산 시작합니다.")
        origin_func(*args,**kwargs) #여기 내부함수 nested_func 함수에서 origin_func
        print("계산 완료되었습니다.")
        return
    return nested_func


  • 구조를 이해하기 위해서는 Closure 에 대해 알아야 하는데
클로저의 3가지 조건
1. 외부함수에서 내부함수를 반환
2. 함수가 중첩(외부함수 내부함수가 있어야한다)
3. 내부함수에서 외부함수의 지역변수를 참조하고 있어야 한다.


배우다 보니 스프링의 AOP 기능과 비슷하다고 느꼈다.


@deco_func
def test(a,b):
    print(a+b)
@deco_func
def test2(a,b):
    print(a*b)
@deco_func
def test3(a,b):
    print(a//b)


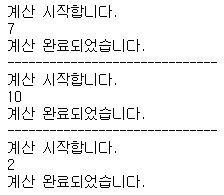
Decorator한 함수를 실행시켜 보니


test(5,2)
print("-"*30)
test2(5,2)
print("-"*30)
test3(5,2)


신기하다.


def new_func(a,b,c,d,e):
    print(a,b,c,d,e)


데코레이터가 적용되는 과정은 결국 클로저 활용과 동일하다.


deco_func(new_func)(1,2,3,100,200)


def a(**u):
    for i in u:
        print(i)
a(t=6, q=8) #키와 벨류로 전달

728x90
반응형
728x90
반응형

람다함수

  • 1회용의 간단한 함수를 만드는것


필터 함수(filterfunction)

def adult_func(n):
    if n>=19:
        return True
    else:
        return False
ages = [34,39,20,18,13,54,23,23]
print('성년 목록')
for a in filter(adult_func,ages):
    print(a, end=' ')

list(filter(adult_func,ages))


set(filter(adult_func,ages))


list(set(filter(adult_func,ages)))


728x90
반응형
728x90
반응형

* 본 포스팅은 주피터 노트북에서 실행하였다.


클래스와 특수 메소드

2차원 벡터를 표현하는 Vector2D라는 클래스를 구현하고 이 클래스를 통해서 특수 메소드의 필요성에 대해 살펴볼 것이다.

class Vector2D:
    def __init__(self,x,y):
        self._x=x
        self._y=y
    def __str__(self):
        return '({},{})'.format(self._x, self._y)
    def add(self, other):
        return Vector2D(self._x + other._x, self._y+other._y)
    

2차원 벡터를 표현하는 Vector2D라는 클래스를 구현하고 이 클래스를 통해서 특수 메소드의 필요성에 대해 살펴보자.

v1 = Vector2D(30,40)
v2 = Vector2D(110,20)
v3 = v1 + v2
print(v3)


  • 에러가 나타나는 이유는 클래스 내부에 어떤 방식으로 덧셈을 할지 그 방법을 서술해야 하기 때문이다.
  • add()라는 메소드를 정의하고 두 벡터의 x 성분과 y 성분을 더하고 이 성분값을 초기값으로 가지는 Vector2D를 반환하도록 하자
v3 = v1.add(v2)                 # Vector2D의 add() 메소드 사용
print('v1 + v2 = ',v3)

  • v1.add(v2)는 두 벡터의 합을 출력한다.
  • add() 메소드 대신에 +, - 와 같은 연산자를 사용하면 보다 편리하다.


class Vector2D:
    def __init__(self,x,y):
        self._x=x
        self._y=y
    def __str__(self):
        return '({},{})'.format(self._x, self._y)
    def add(self, other):
        return Vector2D(self._x + other._x, self._y+other._y)
    def __sub__(self,other):
        return Vector2D(self._x - other._x, self._y-other._y)
    def __mul__(self,other):
        return Vector2D(self._x * other._x, self._y*other._y)
v1 = Vector2D(30,40)
v2 = Vector2D(10,20)
v3 = v1.add(v2) #v1+v2도 가능
v4 = v1-v2
print(v3)
print(v4)


v1 = Vector2D(30,40)
v2 = Vector2D(10,20)
v5 = v1*v2
print(v5)


class Circle:
    PI=3.1415 #클래스 변수
    def __init__(self, name,radius):
        self._name=name
        self._radius = radius
    def area(self):
        return Circle.PI * self._radius**2
        
c1 = Circle('C1',4)
print('c1의 면적 ',c1.area())


c2 = Circle('C2',6)
print('c2의 면적 ',c2.area())


dictionary로 key값 보기

c1 = Circle('C1',4)
print('c1의 속성들 ',c1.__dict__)


print('c1의 name 변수값 ',c1.__dict__['_name'])


print('c1의 radius 변수값 ',c1.__dict__['_radius'])

728x90
반응형
728x90
반응형

* 본 포스팅은 주피터 노트북에서 실행하였다.


객체의 동일성(identity)에 대해 알아보자


list_a = [10, 20, 30]
list_b = [10, 20, 30]
if list_a is list_b:
    print('list_a is list_b')
else :
    print('list_a is not list_b')
    

list_a와 list_b가 다르다고 한다. 왜일까?

id(list_a) #2454901262600

id(list_b) #2454901262088

id()를 이용하여 각각의 id값을 확인했는데 다름을 확인할 수 있었다...


두 인스턴스의 속성값 즉 인스턴스 변수값이 서로 일치하는지 확인하기 위해서는 == 사용

파이썬 == -> 자바 equals
자바 == -> 파이썬 is


위를 참고하여 ==을 이용하니 같다고 떴다.

if list_a == list_b:
    print('list_a == list_b')
else :
    print('list_a != list_b')


a = 'ABC' #문자열 객체를 참조하는 변수 a
b = 'ABC' #문자열 객체를 참조하는 변수 b
if a is b:
    print('a is b')
else :
    print('a is not b')


id(a) # 2454831867584

id(b) # 2454831867584

문자열 객체는 id의 값이 같음을 확인할 수 있다.


문자열이 동일하게 결과가 나오는 것은 동일한 메모리에 있다는 것을 의미하고 문자열을 변경하지 못한다. (immutable)

728x90
반응형
728x90
반응형


* 본 포스터는 주피터 노트북에서 실행하였다.


클래스 정의

  • 프로그램 상에서 사용되는 속성과 행위를 모아놓은 집합체
  • 객체의 설계도 혹은 템플릿 (형틀 template)

인스턴스 정의

  • 클래스로부터 만들어지는 각각의 개별적인 객체
  • 서로 다른 인스턴스는 서로 다른 속성 값을 가질 수 있음


클래스 정의방법

  • class라는 키워드를 써 준 후 class의 이름을 써 준다. 그 후 필요한 속성과 메소드를 파이썬 문법에 맞게 써준다
# 클래스 정의
class Cat:
    def meow(self,i):
        print('야옹 야옹',i)
    def cow(self, t, u):
        print(t+u)
  • 클래스 내부에서 정의되어 클래스나 클래스 인스턴스가 사용하는 함수를 메소드method 혹은 멤버함수member function라 한다.
  • meow() 메소드의 매개변수인 self는 자기 자신을 참조하는 변수이며 메소드의 첫 번째 매개 변수로 반드시 들어가야 한다.
nabi = Cat() #객체 생성
nabi.meow(3)
nabi.cow(3,5)


클래스에서 생성자 정의

# 클래스 정의
class Cat:
    #생성자 정의
    def __init__(self,name,color): #생성자
        self.name=name #self가 들어가면 멤버변수
        self.color=color
    #메서드 (멤버함수)
    def meow(self):
        print('내이름은 {}, 색깔은 {} 이야~'.format(self.name, self.color))
nabi = Cat('나비','검정색')
nero = Cat('네로','흰색')
mimi = Cat('미미','갈색')
nabi.meow()
nero.meow()
mimi.meow()


Cat 객체의 문자열 표현 방식 / __str__ 메소드 적용하기

# 클래스 정의
class Cat:
    #생성자 정의
    def __init__(self,name,color): #생성자
        self.name=name #self가 들어가면 멤버변수
        self.color=color
    #Cat 객체의 문자열 표현 방식
    def __str__(self): #toString과 동일
        return 'Cat(name=' +self.name+' 색상= '+self.color+')'
nabi = Cat('나비','검정색')
mimi = Cat('미미','갈색')
print(nabi)
print(mimi)


캡슐화 encapsulation

  • 메소드와 변수를 외부에서 함부로 조작하는 것을 제한
  • 데이터를 보호
  • 우연히 값이 변경되는 것을 방지
# 클래스 정의
class Cat:
    #생성자 정의
    def __init__(self,name,age): #생성자
        self.name=name #self가 들어가면 멤버변수
        self.age=age
    #Cat 객체의 문자열 표현 방식
    def __str__(self): #toString과 동일
        return 'Cat(name=' +self.name+' age= '+str(self.age)+')'
nabi = Cat('나비',3)
print(nabi)
nabi.age=4
nabi.age=-5
print(nabi)

멤버변수 값이 바뀐걸 확인할 수 있다. -> 데이터 보호(은닉/캡슐화)가 안됨


# 클래스 정의
class Cat:
    #생성자 정의
    def __init__(self,name,age): #생성자
        self._name=name #self가 들어가면 멤버변수
        self._age=age
    #Cat 객체의 문자열 표현 방식
    def __str__(self): #toString과 동일
        return 'Cat(name=' +self._name+' age= '+str(self._age)+')'
    def set_age(self, age):
        if age>0:
            self._age = age
    def get_age(self):
        return self._age
nabi = Cat('나비',3)
print(nabi)
#_ 접근 가능하지만 _로 시작하는 변수는 바로 접근하지 말자는 약속  데이터는 바로 접근 x
nabi.set_age(4)
nabi.set_age(-5)
print(nabi)


nabi.set_age(-5)는 적용이 되지 않음을 확인할수 있다. 함수를 이렇게 저장했기 때문이다!

Cat 클래스


_로 시작하는 변수는 바로 접근하지 말자는 약속이 있다. getter, setter를 이용해서 하자~! 

728x90
반응형
728x90
반응형

* tutle 기본 명령어


import turtle as t

- turtle 모듈을 불러오고 turtle 대신 t를 사용한다.

- 예로 turtle.forward(10) 이 아닌 t.forward(10)의 형식을 사용한다.


turtle.forward(100)

- 앞으로 이동하기100 픽셀 만큼 머리 방향으로 이동

- turtle.fd()로 사용 가능


turtle.backward(100)

- 뒤로 이동하기 100픽셀 만큼 머리 반대 방향으로 이동

- turtle.back() / turtle.bk()으로 사용 가능


turtle.right(90)

- 거북이 객체를 머리 방향에서 오른쪽으로 90도 회전

- turtle.rt()로 사용 가능


turtle.left(90)

- 왼쪽으로 회전하기 머리 방향에서 왼쪽으로 90도 회전

- turtle.lt()로 사용 가능


turtle.pencolor("yellow")

- 펜 색깔을 노란색으로 설정


turtle.fillcolor("yellow")

- 칠하는 색깔을 노란색으로 설정

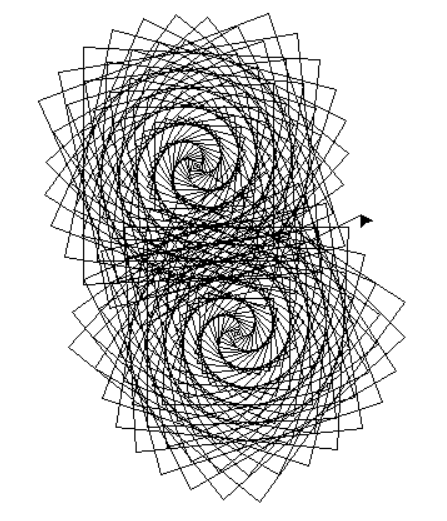
import turtle as t
t.setup(width=400,height=400)
for i in range(200):
    t.forward(i)
    t.left(93)
t.done()

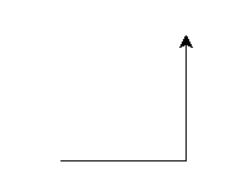
t.setup(width=400,height=400)
t.forward(100)
t.left(90)
t.forward(100)
t.done()

728x90
반응형
728x90
반응형
import math as m
m.sin(0.0) #0도

m.sin(10.0) #10도


m.sin(3.141592/2.0) #phi=3.141592 , 2*phi => radian =360도 #sin90도=1


sin() 안에 값을 radian으로 표현해 보자 비례식으로 구할 수 있다.


phi=3.141592
m.sin((2*phi*90)/360) #radian으로 표현한 것


이와 같은 방식으로 cos 45를 구해보았다.


#cos 45구하기
m.cos((2*phi*45)/360)


728x90
반응형
728x90
반응형

* 본 포스팅은 주피터 노트북에서 실행하였다.


import time
seconds = time.time()
seconds #초단위로 표시


print('바로 출력되는 구문')
time.sleep(4.5)
print('4.5초후 출력되는 구문')


start_time=time.time()
for _ in range(5):
    print('값', 1+2+3+4+6+8+10)
end_time = time.time()
gap = end_time - start_time
print('경과 시간은 : ',gap)

728x90
반응형
728x90
반응형

* 본 포스팅은 주피터 노트북에서 실행하였다.


import datetime
datetime.datetime.now()


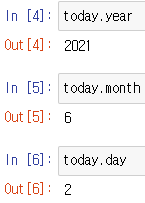
today = datetime.date.today()
today


.year , .month, .day로 년, 월, 일을 확인할 수 있다.


파이썬 내장함수

dir(datetime) # __ => double under , dunder , 파이썬 내장함수, 내장 데이터 타입


import datetime as dt #dt로 rename하기
start_time = dt.datetime.now()
start_time


replace 이용하여 시간 바꾸기

start_time.replace(month=12, day=22) #시간 바꾸기


남은 시간 구하기

today = dt.date.today()
xMas = dt.datetime(2021, 12, 25)
time_gap = xMas - dt.datetime.now()
print('올해 크리스마스 까지는 {}일 {}시간 남았다.'.format(time_gap.days,time_gap.seconds//3600))


728x90
반응형

+ Recent posts